Michael Sheldon's Development Stuff

Michael Sheldon (mike at mikeasoft dot com)

November 20, 2023

Pied Beta
Mike @ 9:11 pm

For the past couple of months I’ve been working on Pied, an application that makes it easy to use modern, natural sounding, text-to-speech voices on Linux. It does this by integrating the Piper neural text-to-speech engine with speech-dispatcher, so most existing software will work with it out of the box.

The first beta version is now available in the snap store:

Get it from the Snap Store

(Other package formats will follow)

I’d appreciate any feedback if you’re able to test it, thanks!


October 23, 2023

How to make Flutter’s AlertDialog screen reader friendly
Mike @ 5:33 pm

While developing Pied, I discovered that Flutter’s AlertDialog widget isn’t accessible to screen reader users (there’s been a bug report filed against this for over a year). Text within the AlertDialog doesn’t get sent to the screen reader when the dialog is focused. The user has no indication that the dialog is present, let alone what its contents are.

Example

The following video demonstrates a typical Flutter AlertDialog with the Orca screen reader enabled. When the ‘Launch inaccessible alert’ button is pressed an alert dialog appears, but the screen reader is unable to read its contents. The ‘Launch accessible alert’ button is then pressed and an accessible alert dialog is demonstrated, with the screen reader successfully reading the contents of the dialog.

The example application used in the video can be found in the accessible_alert_example GitHub repository.

Creating a standard alert dialog

The following code will create a normal Flutter AlertDialog as recommended in the official Flutter documentation. Unfortunately this doesn’t work correctly for screen reader users:

showDialog(
  context: context,
  builder: (context) => AlertDialog(
    actions: [
      TextButton(
        onPressed: () {
          Navigator.pop(context);
        },
      child: const Text('Close Alert'),
      )
    ],
    content: Text(
      'This text is invisible to screen readers. There is no indication that this dialog has even appeared.'
    ),
  )
);

Creating an accessible alert dialog

By making a few small changes to the above code we can make it work correctly with screen readers. First we wrap the AlertDialog in a Semantics widget. This allows us to attach a screen reader friendly label to the AlertDialog. The Semantics label text should be the same as the text displayed in the AlertDialog. Finally, to have this text read as soon as the alert is triggered, we enable autofocus on the TextButton:

showDialog(
  context: context,
  builder: (context) => Semantics(
    label: 'This text will be read by a screen reader. It is clear to the user that something has happened.',
    enabled: true,
    container: true,
    child: AlertDialog(
      actions: [
        TextButton(
          autofocus: true,
          onPressed: () {
            Navigator.pop(context);
          },
          child: const Text('Close Alert'),
        )
      ],
      content: Text(
        'This text will be read by a screen reader. It is clear to the user that something has happened.'
      ),
    )
  )
);

July 27, 2020

Emoji Support for Linux Flutter Apps
Mike @ 3:30 pm

Recently Canonical have been working alongside Google to make it possible to write native Linux apps with Flutter. In this short tutorial, I’ll show you how you can render colour fonts, such as emoji, within your Flutter apps.

First we’ll create a simple application that attempts to display a few emoji:

import 'package:flutter/material.dart';

void main() {
  runApp(EmojiApp());
}

class EmojiApp extends StatelessWidget {
  @override
  Widget build(BuildContext context) {
    return MaterialApp(
      title: 'Emoji Demo',
      theme: ThemeData(
        primarySwatch: Colors.blue,
        visualDensity: VisualDensity.adaptivePlatformDensity,
      ),
      home: EmojiHomePage(title: '🐹 Emoji Demo 🐹'),
    );
  }
}

class EmojiHomePage extends StatefulWidget {
  EmojiHomePage({Key key, this.title}) : super(key: key);
  final String title;

  @override
  _EmojiHomePageState createState() => _EmojiHomePageState();
}

class _EmojiHomePageState extends State {

  @override
  Widget build(BuildContext context) {
    return Scaffold(
      appBar: AppBar(
        title: Text(
          widget.title,
        ),
      ),
      body: Center(
        child: Text(
          '🐶 🐈 🐇',
        ),
      ),
    );
  }
}

However, when we run it we find that our emoji characters aren’t rendering correctly:
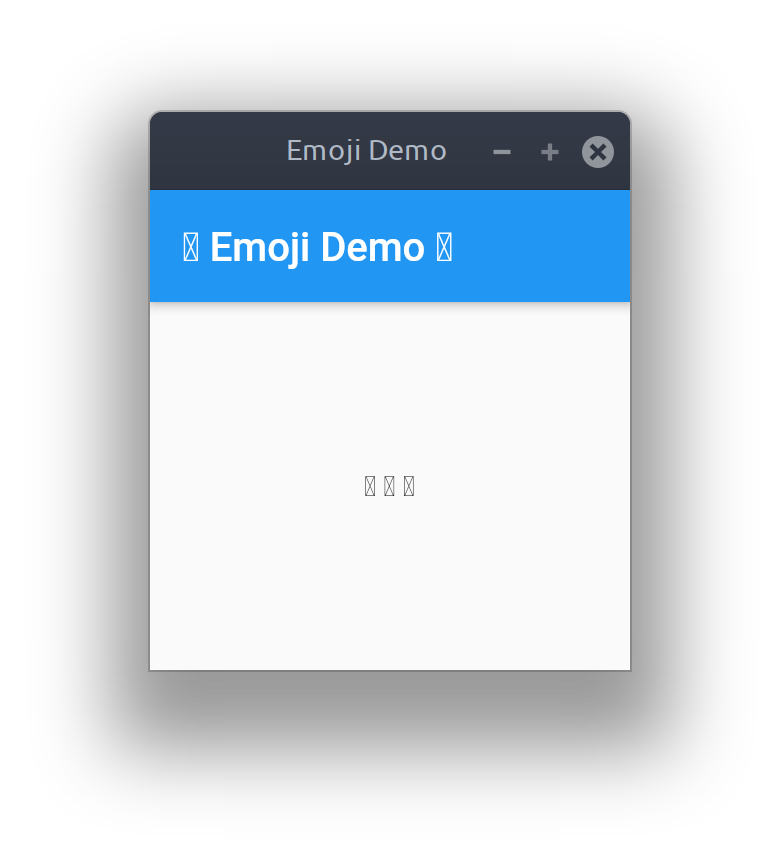
Screenshot showing application failing to render emoji

For Flutter to be able to display colour fonts we need to explicitly bundle them with our application. We can do this by saving the emoji font we wish to use to our project directory, to keep things organised I’ve created a sub-directory called ‘fonts’ for this. Then we need to edit our ‘pubspec.yaml’ to include information about this font file:

name: emojiexample
description: An example of displaying emoji in Flutter apps
publish_to: 'none'
version: 1.0.0+1
environment:
  sdk: ">=2.7.0 <3.0.0"

dependencies:
  flutter:
    sdk: flutter

dev_dependencies:
  flutter_test:
    sdk: flutter

flutter:
  uses-material-design: true
  fonts:
     - family: EmojiOne
       fonts:
         - asset: fonts/emojione-android.ttf

I’m using the original EmojiOne font, which was released by Ranks.com under the Creative Commons Attribution 4.0 License.

Finally, we need to update our application code to specify the font family to use when rendering text:

class _EmojiHomePageState extends State {

  @override
  Widget build(BuildContext context) {
    return Scaffold(
      appBar: AppBar(
        title: Text(
          widget.title,
          style: TextStyle(fontFamily: 'EmojiOne'),
        ),
      ),
      body: Center(
        child: Text(
          '🐶 🐈 🐇',
          style: TextStyle(fontFamily: 'EmojiOne', fontSize: 32),
        ),
      ),
    );
  }
}

Now when we run our app our emoji are all rendered as expected:
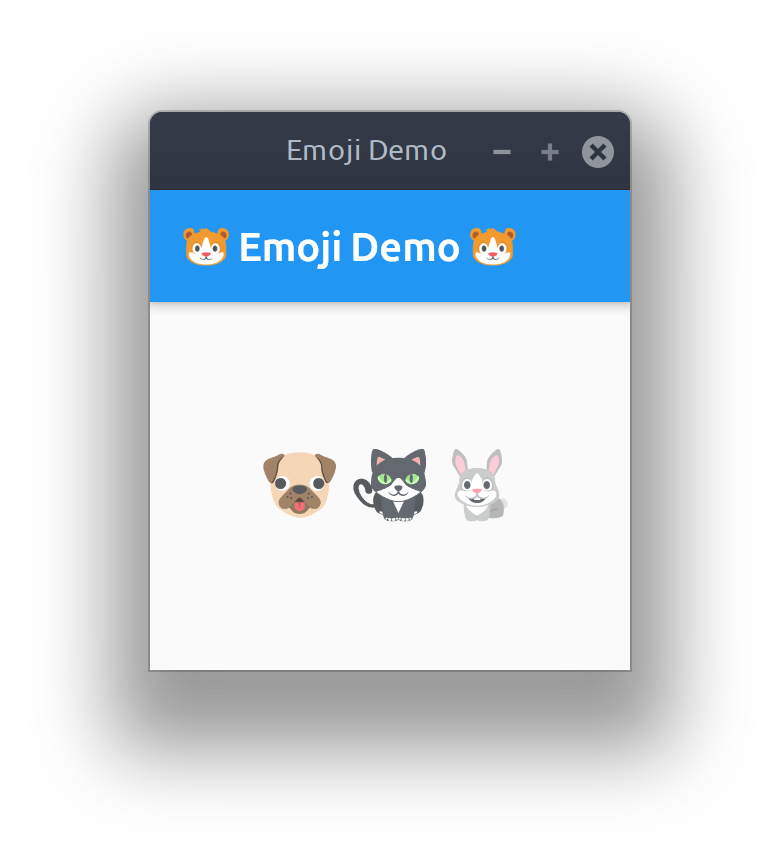
Screenshot showing emoji rendering correctly width=

The full source code for this example can be found here: https://github.com/Elleo/flutter-emojiexample


June 22, 2020

Qt QML Maps – Using the OSM plugin with API keys
Mike @ 4:18 pm

For a recent side-project I’ve been working on (a cycle computer for UBPorts phones) I found that when using the QtLocation Map QML element, nearly all the map types provided by the OSM plugin (besides the basic streetmap type) require an API key from Thunderforest. Unfortunately, there doesn’t appear to be a documented way of supplying an API key to the plugin, and the handful of forum posts and Stack Overflow questions on the topic are either unanswered or answered by people believing that it’s not possible. It’s not obvious, but after a bit of digging into the way the OSM plugin works I’ve discovered a mechanism by which an API key can be supplied to tile servers that require one.

When the OSM plugin is initialised it communicates with the Qt providers repository which tells it what URLs to use for each map type. The location of the providers repository can be customised through the osm.mapping.providersrepository.address OSM plugin property, so all we need to do to use our API key is to set up our own providers repository with URLs that include our API key as a parameter. The repository itself is just a collection of JSON files, with specific names (cycle, cycle-hires, hiking, hiking-hires, night-transit, night-transit-hires, satellite, street, street-hires, terrain, terrain-hires, transit, transit-hires) each corresponding to a map type. The *-hires files provide URLs for tiles at twice the normal resolution, for high DPI displays.

For example, this is the cycle file served by the default Qt providers repository:

{
    "UrlTemplate" : "http://a.tile.thunderforest.com/cycle/%z/%x/%y.png",
    "ImageFormat" : "png",
    "QImageFormat" : "Indexed8",
    "ID" : "thf-cycle",
    "MaximumZoomLevel" : 20,
    "MapCopyRight" : "<a href='http://www.thunderforest.com/'>Thunderforest</a>",
    "DataCopyRight" : "<a href='http://www.openstreetmap.org/copyright'>OpenStreetMap</a> contributors"
}

To provide an API key with our tile requests we can simply modify the UrlTemplate:

    "UrlTemplate" : "http://a.tile.thunderforest.com/cycle/%z/%x/%y.png?apikey=YOUR_API_KEY",

Automatic repository setup

I’ve created a simple tool for setting up a complete repository using a custom API key here: https://github.com/Elleo/qt-osm-map-providers

  1. First obtain an API key from https://www.thunderforest.com/docs/apikeys/
  2. Next clone my repository: git clone https://github.com/Elleo/qt-osm-map-providers.git
  3. Run: ./set_api_keys.sh your_api_key (replacing your_api_key with the key you obtained in step 1)
  4. Copy the files from this repository to your webserver (e.g. http://www.mywebsite.com/osm_repository)
  5. Set the osm.mapping.providersrepository.address property to point to the location setup in step 4 (see the QML example below)

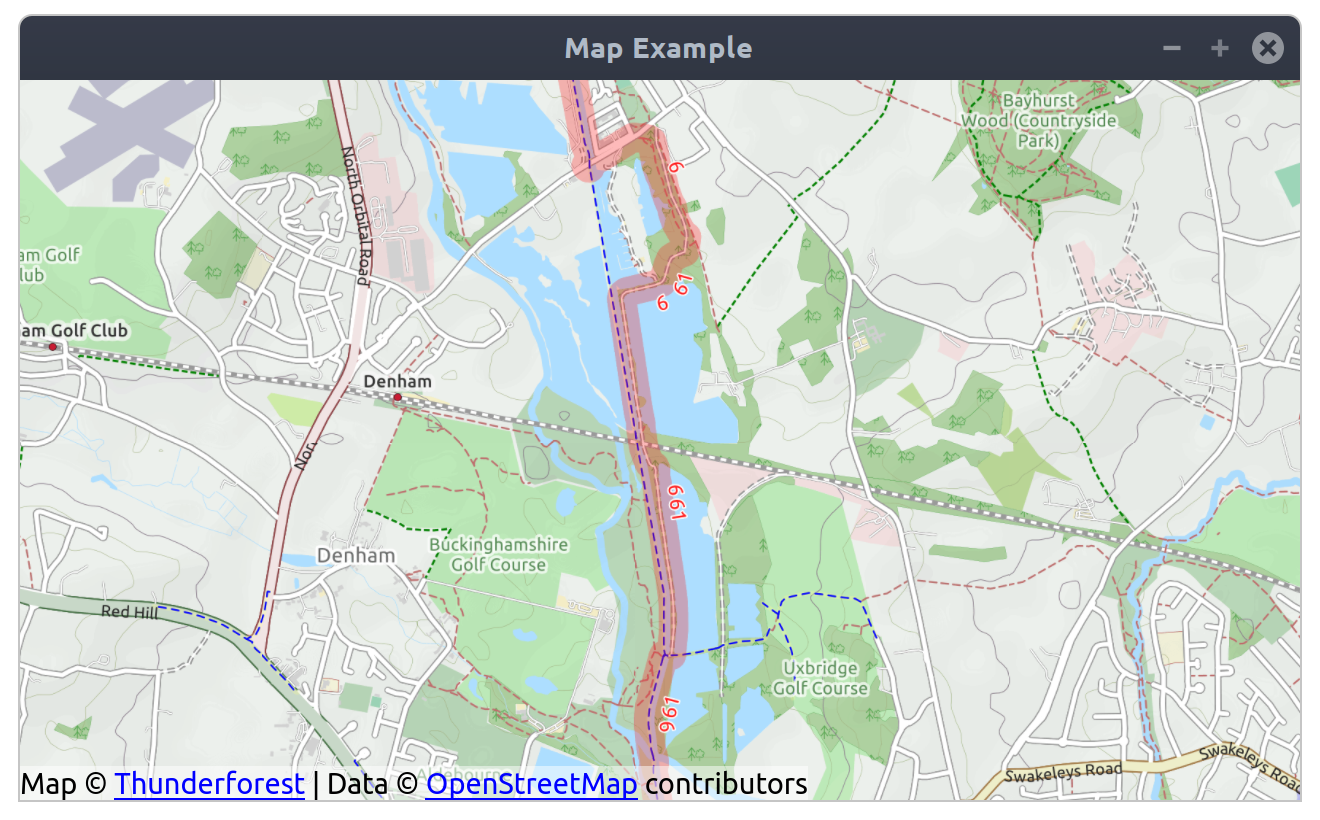
QML Example

Here’s a quick example QML app that will make use of the custom repository we’ve set up:

import QtQuick 2.7
import QtQuick.Controls 2.5
import QtLocation 5.10

ApplicationWindow {

    title: qsTr("Map Example")
    width: 1280
    height: 720

    Map {
        anchors.fill: parent
        zoomLevel: 14
        plugin: Plugin {
            name: "osm"
            PluginParameter { name: "osm.mapping.providersrepository.address"; value: "http://www.mywebsite.com/osm_repository" }
            PluginParameter { name: "osm.mapping.highdpi_tiles"; value: true }
        }
        activeMapType: supportedMapTypes[1] // Cycle map provided by Thunderforest
    }
    
}


December 30, 2017

Speech Recognition – Mozilla’s DeepSpeech, GStreamer and IBus
Mike @ 9:13 pm

Recently Mozilla released an open source implementation of Baidu’s DeepSpeech architecture, along with a pre-trained model using data collected as part of their Common Voice project.

In an attempt to make it easier for application developers to start working with the DeepSpeech model I’ve developed a GStreamer plugin, an IBus plugin and created some PPAs. To demonstrate what’s possible here’s a video of the IBus plugin providing speech recognition to any application under Linux:


Video of DeepSpeech IBus Plugin

GStreamer DeepSpeech Plugin

I’ve created a GStreamer element which can be placed into an audio pipeline, it will then report any recognised speech via bus messages. It automatically segments audio based on configurable silence thresholds making it suitable for continuous dictation.

Here’s a couple of example pipelines using gst-launch.

To perform speech recognition on a file, printing all bus messages to the terminal:

gst-launch-1.0 -m filesrc location=/path/to/file.ogg ! decodebin ! audioconvert ! audiorate ! audioresample ! deepspeech ! fakesink

To perform speech recognition on audio recorded from the default system microphone, with changes to the silence thresholds:

gst-launch-1.0 -m pulsesrc ! audioconvert ! audiorate ! audioresample ! deepspeech silence-threshold=0.3 silence-length=20 ! fakesink

The source code is available here: https://github.com/Elleo/gst-deepspeech.

IBus Plugin

I’ve also created a proof of concept IBus plugin which allows speech recognition to be used as an input method for virtually any application. It uses the above GStreamer plugin to perform speech recognition and then commits the text to the currently focused input field whenever a bus message is received from the deepspeech element.

It’ll need a lot more work before it’s really useful, especially in terms of adding in various voice editing commands, but hopefully it’ll provide a useful starting point for something more complete.

The source code is available here: https://github.com/Elleo/ibus-deepspeech

PPAs

To make it extra easy to get started playing around with these projects I’ve also created a couple of PPAs for Ubuntu 17.10:

DeepSpeech PPA – This contains packages for libdeepspeech, libdeepspeech-dev, libtensorflow-cc and deepspeech-model (be warned, the model is around 1.3GB).

gst-deepspeech PPA – This contains packages for my GStreamer and IBus plugins (gstreamer1.0-deepspeech and ibus-deepspeech). Please note that you’ll also need the DeepSpeech PPA enabled to fulfil the dependencies of these packages.

I’d love to hear about any projects that find these plugins useful 🙂


April 21, 2014

Deep Vision – State of the art computer vision for Ubuntu Touch
Mike @ 5:58 pm

Over the Easter weekend I finally got around to implementing a first prototype of an idea I’ve had for a while, which aims to bring some state of the art computer vision techniques to mobile devices.

Deep Vision uses the implementation of convolutional neural networks provided by libccv to classify images. So it’ll try to figure out whatever is the principal object in an image your provide it with.

At the moment it just has a sample classification database from the ImageNet project, containing 1000 assorted items, however in the future I’d like to see specific classifiers for different tasks (e.g. a classifier trained purely on different plants, so when you’re out for a hike and you want to know what something is you can just point your phone at it and find out.)

Unlike something like Google Goggles it’s doing all the classification on the phone itself without needing to upload the image to any external services.

The video below provides a quick demo of it in action and you can also grab a click package here to play with it yourself: http://mikeasoft.com/~mike/com.mikeasoft.deepvision_0.1.3_armhf.click

Source code can be found at: https://launchpad.net/deepvision

It was just hacked together over the weekend, so it’s still a little rough in places but all the core functionality should work reasonably well :).

Video of Deep Vision


March 2, 2014

QML and Box2D Game Template for Ubuntu Touch
Mike @ 11:57 pm

Tomorrow (Monday the 3rd of March) at 5pm UTC I’ll be giving a talk about QML and Box2D based game development for the Ubuntu App Developer Week, details of my talk can be found here: http://summit.ubuntu.com/appdevweek-1403/meeting/22144/game-development-with-qml-and-box2d/

In preparation for this I’ve put together a simple template for getting started with QML and Box2D development for both desktop Ubuntu and Ubuntu Touch. It’s available in two flavours:

  • Precompiled version – Includes QML Box2D already compiled for amd64 and armhf (when I have more time I’ll add i386 to this as well).
  • Source version – Makes it easy to compile everything yourself on whatever architecture you’re interested in.

This means that if your game is going to be purely QML based you can just grab the precompiled version, and run “make click-packages” and have packages built for both desktop and mobile use at the same time.

The template comes populated with an example application (one of the standard QML Box2D demos), which is found in the “src/” directory; so you’ll be able to see something running straight out of the box, then when you’re ready you can just replace this with your own game.

In the future I also plan to extend these templates to provide example packaging for multiple different QML + Box2D compatible mobile platforms (Sailfish, MeeGo, Blackberry, Android, etc.)

If you’re interested in seeing an example of the sort of thing you can achieve fairly easily with QML and Box2D I’ve also uploaded a video of one of my current work in progress projects:


Splort! A QML and Box2D based mobile game


December 30, 2013

Rockwatch 1.3 Released
Mike @ 4:00 pm

Rockwatch

Overview

Rockwatch allows your N9 to communicate with a Pebble smart watch. It makes it possible to install and manage Pebble apps, upgrade your Pebble’s firmware, receive notifications of e-mails and SMS messages and control your music from your Pebble.

New features in version 1.3

  • Support for incoming calls and caller ID.
  • Fixes incorrect time offsets when setting the watch’s time from the phone.

Download

Available in the Ovi Store


November 12, 2013

CuteSpotify for Ubuntu Touch
Mike @ 12:18 am

Overview

CuteSpotify makes it possible to listen to your Spotify songs on Ubuntu Touch. It’s based on MeeSpot (a MeeGo Spotify client), which I’ve updated to make use of Qt5 and Ubuntu’s QML components. It’s still a little rough around the edges but most of the core functionality is in place now.

One particular problem to look out for is that because of the way Ubuntu Touch currently handles applications CuteSpotify has to be kept in the foreground and the phone has to be kept switched on for music to play (otherwise the application gets suspended). Approaches for handling applications that need to keep running are currently being debated, so hopefully that won’t be the case in future version of Ubuntu Touch.

As a temporary workaround, if your phone is in developer mode (achieved by connecting it up to the Ubuntu SDK) you can run “sudo service powerd stop” (default password is phablet) to stop the phone from going to sleep while you’re listening to music, then “sudo service powerd start” to resume normal power management when you’re done. (See popey’s comment for an alternative method).

Video


Video of CuteSpotify running on Ubuntu Touch

Installation

To install CuteSpotify on Ubuntu Touch simply search for “CuteSpotify” on your phone and it should appear.

Source

The source code for CuteSpotify can be found here: https://github.com/Elleo/cutespotify


November 7, 2013

Eyrie for Ubuntu Touch
Mike @ 12:15 am

Overview

Eyrie is a music identification program that I originally created for the Nokia N9 but which I’ve now also ported to Ubuntu Touch. It works in a similar way to commercial applications like Shazam and SoundHound, listening to music through the phone’s microphone and then generating an acoustic fingerprint using the open source EchoPrint algorithm. Currently the EchoPrint database isn’t anywhere near as large as the various commercial offerings, so it won’t recognise everything, but it has reasonable coverage.

Video


Video of Eyrie running on Ubuntu Touch

Installation

To install Eyrie on Ubuntu Touch simply search for “Eyrie” on your phone and it should appear.


Next Page »

Powered by WordPress